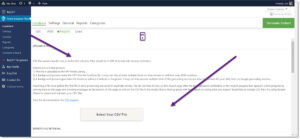
Importing Locations With Territories

Importing locations with territories follows the same procedure as importing a standard locations file.  As with all location files the format must be a proper CSV file exported using the UTF-8 character set with no special or non-printable characters.

To load the territory data you must have first enabled the territories feature in the Premier Add On.  You will also need to have installed and activated with the Pro Add On or Power Add On for Store Locator Plus.

Your CSV file should add the following five columns to the file.    Make sure you add the field names to the top of each of these new columns as listed here:

  • territory_distance_unit
  • territory_distance_north
  • territory_distance_south
  • territory_distance_east
  • territory_distance_west

Within each column you will want to have the following values:

  • territory_distance_unit can be ‘miles’, ‘km’, or be blank.  If this is not set to ‘miles’ or ‘km’ it will assume the territory is not enabled for this location.
  • territory_distance_north , south, east, and west should be the distance north, south, east, or west from the location that is part of its territory.

The territory boundaries will automatically be calculated for each location during the import.

Highlighting Locations Served By Territory

Premier 4.5 Territory Results Highlight Example

Version 4.5 of the Premier Add On for Store Locator Plus introduces territories to locations.

Once a location is setup with a territory the map markers that are sent back from the server during a user search will include a ‘in_territory’ property set to ‘1’ if the user’s location is within the territory and ‘0’ if not.   An additional ‘in_territory_class’ property will also be set to either ‘in_territory’ or a blank string.   Both settings are part of the ‘data’ property of the location marker.

Enabling Territory Features

Version 4.5 of the Premier add on for Store Locator Plus introduces territories to locations.

Before you can use the territories features of the Premier add on, you will need to enable the feature under the General / Data tab.   This is off by default to reduce the data storage and processing overhead of Store Locator Plus for sites that do not need territory services.  Go to the General / Data tab and check off “Enable Territory Bounds” and click save.   This will create the necessary data fields and enable territory settings and features within the application.

SLP 4.5 Premier 4.5 General Data Tab


If you later disable this feature any of the existing location territory data will be retained until you delete the location.    However the location search process will no longer restrict search results to locations within a territory nor output data related to locations being inside or outside of a territory; assuming those features are enabled in the Experience settings.

Location Data

Locations will now show several new fields when managing a location.

Premier 4.5 Editing A Location Territory

Territory Distance Unit – what is the distance unit used with this location to determine the territory coverage.  None disables the territory.

Distance North – how many miles to the north of the location is the northern boundary of the territory.

Distance South – how many miles to the south of the location is the southern boundary of the territory.

Distance East – how many miles to the east of the location is the eastern boundary of the territory.

Distance West – how many miles to the west of the location is the western boundary of the territory.

When the location is saved the Territory Bounds is calculated.   Editing the location will show the location point as well as the territory it covers.

User Experience Settings

Under the experience tab there is a setting the dictates how locations are shown to the user.

Experience Results Functionality settings

By default the standard “find locations within this distance of a user” is used.    Any location that is within the selected radius from the address the user entered is shown on the map.  Site designers and use the Experience Results Layout and Custom CSS settings to highlight locations that service the address the user has entered.

If you check of the Only Show If In Territory checkbox under the Experience / Results tab in the Functionality group the list of locations shown to the user will only include the locations where the user’s address is within the location’s territory.    The radius is still used to limit the results that the server processes.    If the radius is hidden and set to a default value, caution should be taken to set a reasonable radius.   Checking if a point lies within a territory can be time consuming.  First limiting the locations to a reasonable list by first filtering those within a certain distance of the user can sped up processing.

For example, if none of your territories are more than 100  miles from the location you can reasonably set the default radius to be all locations within 100 miles.   This will limit how many locations need to have their boundaries tested to see if the user’s address is within.  This will improve your territory matching performance.

Search By Radius, Technical Details

Why Search By Radius?

The design of the search is based on the premise that most people that are searching for something don’t care what state (where) your store is located.  They only care that it is 3 miles away not 30 miles away.

I understand this is not a perfect solution for everyone.  Sometimes you need to refer someone to the proper sales agent based on sales territories which are typically based on state/city/country.    Discrete search  can help with that, however territory support is not part of the basic Search  add-on unless your territories are divided by city, state, or country alone. Directory Builder add-on can be used for territory search of that nature if no Map is included.  Territories is now included in the Premier Add-on

Generating Store Pages

Included in WPSLP Power.

Create data-driven WordPress pages for each location in your Store Locator Plus locations table.   The layout that builds the initial pages can be modified and pages created, or re-created, en- masse.   Once the initial Store Pages have been created they can be modified on a per-location basis.

To get started you must first Enable Pages.

Info Tab: How to use WPSLP

INFO TAB

You will find useful links to our documentation site as well as news and posts about releases, technical information and an overview of the plugin.

How to Use Guide and Getting started links

Plug-in environment

What is meant by the  Plugin Environment.

The plugin environment shows the versions of Store Locator Plus, and any active SLP add-ons you have installed, as well as the WordPress version, php version, MYSQL , the domain name and other useful data

This information is required when posting in forums. You can find the release versions under your account Downloads List, and/or review the Release details to see if you have the most recent version of Store Locator Plus and the various add-on packs.

Location Imports

Location Imports are handled via a CSV file for users that signed up for the MySLP Professional  SaaS service or are using the WPSLP Power Add On with Store Locator Plus plug-in for Word Press current version. With MYSLP the import feature is under the StoreLocatorPlus sidebar/locations as shown in screenshot. If you are using WPSLP self managed and have the Power add-on it will look similar.

CSV Import Format

Getting the proper CSV format can be a challenge when using spreadsheet apps like Excel or Numbers.  Here are some tips to getting a valid CSV format out of a spreadsheet app:

  1. Make sure you always have a header row.  That tells the import process what data is in each column.   The column headers have meaning, so be precise.
  2. When a cell is a text field that STARTS WITH A LEADING ZERO, make sure you explicitly mark the cell as text.   The easiest way to do this is to type a single apostrophe then the number when adding data to the cell as in ‘01886 for the zip code 01886.
  3. Always export with UTF-8 support enabled.
  4. Export to a CSV format.  Comma delimited not tab delimited and quoted strings if given the option.

Check out the Example CSV Imports post to get some usable import files you can play with.

Displaying WooCommerce Buy Buttons In Location Lists

The Premier add-on, available exclusively to Premier Subscription members,   allows the Store Locator Plus locations to be associated with WooCommerce products.    You can find details on how to associate the products with the locations in our Associating WooCommerce Products With Locations article.    This article explains how to display products along with a “buy now” link in your Store Locator Plus location results.

Requirements

You will need the following products installed and active on your WordPress site:

Displaying Buy Buttons In Locations

As long as you have WooCommerce installed and activated and the products SKUs you have associated with your locations, Store Locator Plus will automatically output a Buy Now button that is preceded by the product title and pricing any time you use the special [slp_location woo_buy_links] shortcode in your Results Layout or Info Bubble Layout in Store Locator Plus.

The Experience add-on pack provides a setting on the admin interface of WordPress where you can edit the Results Layout and place the WooCommerce product buy buttons anywhere you would like in the results listing.

If a location has multiple products associated with it, the products are listed on-after-another in the area where you put the [slp_location woo_buy_links] shortcode.

The following is a simplified output for the location details that includes the buy button links.

<div id="slp_results_[slp_location id]" class="results_entry">

<div class="results_row_left_column"   id="slp_left_cell_[slp_location id]"   >
<span class="location_name">[slp_location name]</span>
<span class="location_distance">[slp_location distance_1] [slp_location distance_unit]</span>
</div>

<div class="results_row_center_column location_secondary" id="slp_center_cell_[slp_location id]" >
<span class="slp_result_address slp_result_citystatezip">[slp_location city_state_zip]</span>
<span class="slp_result_address slp_result_country">[slp_location country]</span>
</div>

<div class="results_row_right_column location_tertiary"  id="slp_right_cell_[slp_location id]"  >
[slp_location woo_buy_links]
</div>

</div>

Buy Button Pricing

The pricing for the products will be based on the pricing data provided in the woo_products field for the location.   If only a SKU is present the default pricing for the product will be used.   If a per-location price has been provided for a SKU then the per-location price will override the default price when the item is added to the cart.   See the Associating WooCommerce Products With Locations article for more details.

Styling The Results

In addition to being able to to add your own DOM elements with custom class names and IDs, the Premier add-on also uses a rudimentary span-in-dive layout for the WooCommerce product information.

The default layout is a div of class woo_buy_block followed by three independent spans of class “woo_product_title” , “woo_price”, and “woo_buy_link”.    These divs will be stacked on top of each other within the results layout.

<div class="woo_buy_block">
<span class="woo_product_title"> . $woo_title                        . </span> .
<span class="woo_price">         . $woo_product->get_price_html()    . </span> .
<span class="woo_buy_link">      . $buy_link                         . </span> .
</div>'

You can  use the CSS Editor provided by the Pro Pack , upload your own custom CSS file to your WordPress theme or the Store Locator Plus plugin directory, or use the CSS Editor that is provided by many WordPress Themes to override the general look-and-feel of the WooCommerce product links presentation in the location results.


Related

Associating WooCommerce Products With Locations

Associating Store Locator Plus locations with WooCommerce products is a new feature provided by the Premier plugin for Store Locator Plus.    The Premier plugin is an add-on that is available exclusively to Premier Subscription holders.

In order to activate the WooCommerce product mapping features of the Premier add-on, you will need to WooCommerce installed and activated on your site.    When WooCommerce is installed the WooCommerce modules are automatically activated within the Premier add-on.  You should activate WooCommerce before importing locations with WooCommerce product relations.

Creating A Locator Page

Summary

To create a locator page that has a zip/postal code search box, a map of your locations, and the results list put the [slplus] shortcode on a page or post.

Go to Pages in your WordPress admin.

Create a new page.

Name it “Locations”.

Enter [slplus] in the main content area of the page.

Details

First create a new page for your WordPress site where the Store Locator Plus plug-in will reside. Add the shortcode (a special label inside of square brackets that is used within WordPress pages and posts to display the output from a plugin). You place a shortcode within the text of your page or post and the plugin will “do it’s magic”

Locator Shortcode

To display the Store Locator Plus search form, map, and search results using the defaults you have setup via Map Settings in the admin panel, use the following shortcode:

[slplus]

The base plugin will replace the shortcode with a search form, a Google Map, and a results section below the map.   Depending on how you have the plugin configured the map and results may start by showing some or all of your locations.

  • Hint: Do not copy and paste off this page or all you will see is the text. You must type in the shortcode onto your WP page.
SLP slplus shortcode

Additional Shortcodes can be found under the SLP documentation Shortcodes:SLP