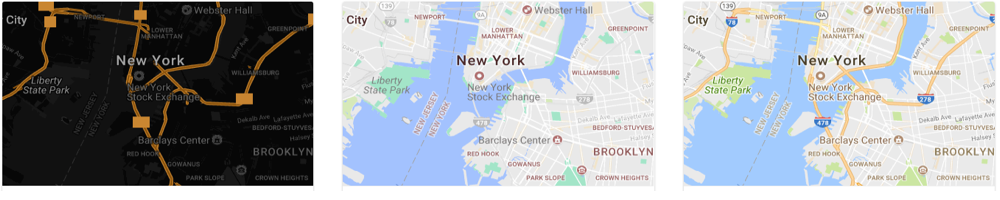
Step 1: WordPress Users Need A Google API Key

SaaS users can skip this step. Store Locator Plus® for WordPress users need a Google API key to utilize the full features available in the the plugin. WordPress administrators who are self-managing their plugin updates, security, and Google services need to setup a Google API account so they can start billing for map services. 

If you are a subscriber to  Store Locator Plus® – our SaaS directory and locator service, you can ignore this page, we’ve got it covered. Go to our Getting Started guide and move on to Step 2.

For the Store Locator Plus® for WordPress users these instructions are a general guideline. You will need to visit Google and read their User guide to obtain a new account or update your existing account. Google will bill you directly for your monthly map views and location look-ups.

Step 3: Add A Location Map To Your Site

stock

Add a location map to your site by putting the SaaS embed code or WordPress shortcode on any page. You’ll need to have an active Store Locator Plus® SaaS subscription or have the Store Locator Plus® for WordPress plugin installed and activated.

Make sure you’ve completed the initial configuration and setup steps outline in the Store Locator Plus® Getting Started article.

When a visitor goes to a page with the Store Locator Plus® map code embedded, it will show a default search form and a map centered in your country or on the “Center Map At” address you entered when configuring Store Locator Plus®. When someone searches for a zip code that is close enough to a location you entered it will show those locations on the map.

Location Results Report

Location Results reports are included with the Professional or Enterprise plan. This report is designed to show the locations that were returned by users entering addresses on the search form when looking for locations. This can be useful for determining which locations are appearing most frequently for your site visitors.

To view this report you’ll need to turn on reporting features as outlined in the Reports documentation.

Location Results Report 2208.15+

This report will show up to the top 500 locations returned within the date range selected.

Location Search Report

Location Search reports are included with the Professional or Enterprise plan. This report is designed to show what addresses users are entering on the search form when looking for locations. This can be useful for determining areas where your site visitors are looking for your product or service.

To view this report you’ll need to turn on reporting features as outlined in the Reports documentation.

Location Search Report v2208.15+

This report will show up to the top 500 searches within the date range selected.

How To : Location Categories

Assumptions

WordPress environment is setup and configured including activation of the following plugins

  • Store Locator Plus®
  • SLP Power add on

In addition map service (Google API keys) should be in place and some locations should be added to the system.

A page has been created with the [slplus] shortcode present and the map is rendering properly.

Users are logged in as a WordPress administrator (the process will be slightly different for SaaS users).

Adding Categories To Locations

Objective

Create a location category and attach it to an existing location.

User Action: Add A Location Category

  1. Click on Store Locator Plus® | Categories in the WordPress sidebar menu.
  2. In the left “Add New Category Form”…
    1. Type a category name. (Restaurant)
    2. Click Add New Category
Result

The new category should appear on the category list on the page.

Category list after adding the restaurant category.

User Action: Attach Category To Location

  1. Click on Store Locator Plus® | Locations in the WordPress sidebar menu.
  2. Click the Edit action icon on the first location.
  3. Check off the box next to “Restaurants” in the Power | Categories section of the form.
  4. Click Save.
Result

The category is assigned to the location and appears on the location table.

The location with an assigned restaurant category. This view is showing fewer columns as the Screen Options was updated to removed unused columns from the table view.

User Action: Show Category Select On Front End

  1. Click on Store Locator Plus® | Settings in the WordPress sidebar menu.
  2. Change the Category Selector setting to “Single Drop Down”.
  3. Click Save
  4. On the front end, go to the page that has the [slplus] shortcode.
Result

The search form for the map should show a category drop down.

The front end page with the [slplus] shortcode, showing the category selection filter.

User Action : Filtering Locations With Category

  1. On the front end, go to the page that has the [slplus] shortcode.
  2. Enter an address, choose a category.
  3. Click “Find Locations”.

Where to find the Store Locator Plus for WordPress Plug-in versions and updates

WordPress Plug-in Log-in

For the WordPress SLP stand alone (do it yourself) plug-in , the latest update to the Word Press base plugin normally appears in your WordPress site Plugin menu for auto update

To check your version against what is currently available  please see the site home page under Support/Versions

The WordPress Store Locator Plus base plug-in is again available in the WordPress plug-in directory.    If you purchased an add-on  you will  need to log into your WPSLP account and download it manually the first time you use it.

ALWAYS BACK-UP your site immediately  before updating any Plug-ins.

How to manually update.

Most Common “What Should I Buy” Questions

Some of the most common features requested are included with either the Plug-in for WordPress using add-ons OR a higher level plan if you use the all inclusive (but separate from the plug-in) Store Locator Plus Software as a Service (SaaS)

MySLP to WPSLP Comparison

Advanced is comparable to the basic Store Locator Plus plugin.

Professional is the Power level (excluding SEO Pages) plus the Experience add on.

Enterprise is the Professional level plan plus the Premier subscription features, functionality  and  support services.

Read below for answers to these questions and check out our other “What To Buy” articles.

Search by Name

Additional Search settings are available if you are using either:

Word Press Store locator Plus plugin with the Experience Add-on , or  the Store Locator Plus SaaS / Professional level plan.  have multiple search tool options to display on the front page when a site visitor lands on your locator page. Search by Name is a checkbox that is found under the Store Locator Plus “Settings/Search” menu.   

The default is “Name” 


Geocoding stopped working suddenly

(This page has been updated to reflect the changes in Google Cloud Platform API changes)

Most likely reasons;

  • You moved your site or changed the domain name and did not change your Google Map API key or , as of JUNE 2018 Google API changes, did NOT ADD BILLING TO YOUR API KEY . See Getting Started
  • Check your Google Platform Usage reports
  • A self-imposed usage cap has been exceeded.
  • The provided method of payment is no longer valid (for example, a credit card has expired).
  • You have exceeded the QPS limits for a given API.
  • If you have the Power add-on and are using the import function , your csv file is incorrect, or your header rows are not accurate,  or they have wrong field names, the columns may be misaligned and the data field for an address could not import and/or does not geocode. Check your import message log.
  • Google does not recognize an address. See FAQ post

Mixed Content Warnings and Site migration

Google’s push for all websites to be HTTPS  has been a game changer over the past few years with many companies  switching from HTTP to HTTPS with some hiccups along the way.  Some of the site transfer mishaps are minor, but if done incorrectly can cause your plug-ins to misbehave , and often is the case, after the transition team has left the building.

Mixed Content Warnings – Loading Assets Over HTTP

If you have never had HTTPS on your site, you will undoubtedly run into an issue with how your site assets are loaded. By assets we are referring to things like images, JavaScript, and even your CSS.   Insecure assets may not stop the green padlock from showing in browsers, but it will add an exclamation point warning to your users that information is being loaded insecurely.

 Site Migrations Vary

Occasionally we see comments from customers that Store locator Plus broke their site or is not working. When asked if they recently  migrated their site they often state nothing has changed.   On further investigation , or by inspecting their console  we often see the “Mixed Content warnings” quite often for images or icons from older versions of Store Locator Plus. This is a sure fire clue that there was indeed a “site migration”. They started out with their site when  the SLP plug-in was originally installed as HTTP and now , at least part of their site, is HTTPS.  This is known as  a protocol migration. If you migrate your site from HTTP to HTTPS, Google treats this as a site move with a URL change. That means you may need to obtain a new Google API key for SLP to work properly. With version SLP 4.9.15 you are allowed to add HTTP referrers now as long as you also obtain a geocode key. See  info about those changes under news

Upfront Investment

A site migration is a great opportunity to address legacy issues. If you have outdated legacy add-ons  this is a good time to invest in your future by planning for and including any  update expenses in your overall budget.  Including these costs in the project scope is the most cost-effective method to ensure your site stays relevant and on-track. When you consider that  issues that may arise after going live will require additional time , resources and, yes, may even create downtime and loss of traffic  to your site it is worth including the new versions in your budget. Contact support if you have made a recent purchase or check our What to Buy guide for options.