Premier Members with an active subscription can restrict the number of locator queries that can be made by a single IP address. This feature can help prevent “location list theft” where a competitor uses the locator to scrape location information from a website or JavaScript query.
Note: In order to enable these settings you must enter your Premier Subscription user ID and Subscription ID under the General / Admin tab. When entered correctly the notice under “Add On Packs , Subscription Accounts” will tell you your subscription is validated. This feature is only functional while your subscription is active.
When your subscription has been validated you will see new options available to you under several Store Locator Plus tabs. The new Security settings will appear under the General /App subtab as shown below.
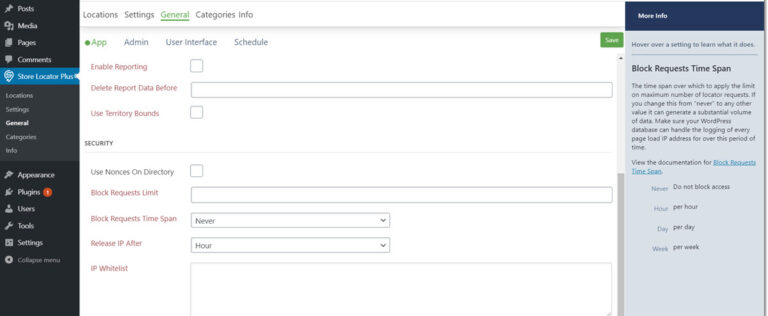
Block Requests Limit
This is the maximum number of location searches a user can perform within the Block Requests Time Span before their IP address is blocked from all locator requests.
This should be set to an integer value greater than 0.
The first page load request from an IP address is always allowed, even if this setting is 0.
If this is set to “2” and the Block Request Time Span is set to “Hour” the system will allow 2 location searches before the IP address is blocked.
The initial loading of the locator page will count as a “search” if you have the default “show locations at startup” enabled.
Changing this parameter will not release already-blocked IP addresses.
Block Requests Time Span
This setting determines over which period of time the locator request limit is checked. A user that has more than the Block Requests Limit number of locator searches performed in this time period will cause their IP address to be blocked from future location searches until their IP is “released” from the block list.
Setting this value to Never will disable the IP blocking system.
Changing this parameter will not release already-blocked IP addresses.
Release IP After
This is the maximum amount of time a request is “remembered” for a given IP address. Once this amount of time has passed since the most recent location request that triggered the block the IP address is “released” and once again free to perform location searches.
IP Whitelist
A list of IP addresses that will not be tracked by the blocker. This allows unlimited location lookups from these IP addresses.
Each address entry should be on a separate line.
Uses standard Classless Inter-Domain Routing (CIDR) format. Typical entries include:
- Whitelist a specific IP address: 192.168.1.1
- Whitelist an entire C-class block: 192.168.1.0/24
Related Notes
Keep in mind that an IP address is not a unique “user” or “computer”. Many locations share an IP address such as a hotel or your local Starbucks. The limitations will apply to the entire group of users from the same shared IP address.
Once an IP address has been blocked, subsequent location requests are not tracked until the block has been released. This design lessens the server load in both volume of data stored and data I/O requests. It helps alleviate issues from possible denial-of-service type attacks where a bot loading requests in rapid succession could overwhelm the data storage and/or database I/O processing.
Blocking Locator Requests was added in the Premier Plugin version 4.7.11.