Map Panel Settings

Under the menu for SLP / Settings /Map  :

The settings contained in the map panel will change the functionality of the map domain, center map, zoom and appearance.

The following settings are available to manage functionality for both WPSLP stand alone plug-in and MySLP SaaS managed service..

At Startup

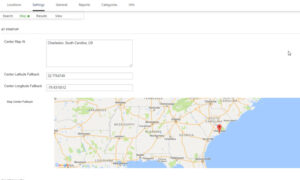
  • Center Map:   This is where you enter an address, or a state, or a location or  a specific latitude and longitude to be displayed as the initial focus for the Map.   If nothing is entered in this box , the default will be the center of the United States .   Google map has determined the center of  United States to  be somewhere in Kansas.  Example:  See Google Localizing the Map:  The geocodes “Toledo” based on the default region (US) to “Toledo, Ohio”  or  one which biases results based on a region set to ES (Spain) to “Toledo, Spain.
  • Center Latitude Fallback: Center Longitude Fallback:  These are the latitude/longitude settings  that will be called if the Google server is “busy” or offline and not able to geocode or “call” to load your locations.  If you reset to blank it will fill in with the Center latitude/longitude of the map domain you have chosen.    You can have a different Lat/long fallback  then your map domain or center map if you  choose.    An image of your fallback will  be displayed

What To Buy: Filter By Brand

Question

We need to filter our locations by brand.  Does your plugin or an extension to your plugin have this feature?

Assigning Brands To Locations

Power add-on for WPSLP (DIY)  or the Professional level plan (or higher) for MySLP is the right choice for doing that.  Either  allows for simple categories or  parent/child relationships between categories. Locations can be assigned to one or more categories. Your users can then search for locations based on those categories.

For more complex hierarchical functionality , button barshorizontal check-boxes for categories and more customized approaches you might want to check out our WPSLP Premier subscription or the MySLP Enterprise level subscription

Add a category for each brand you offer and your users will be able to filter locations showing only those that offer specific brands.

Results Settings and interaction

Additional Results Interaction features  are available with the MySLP/Enterprise or   WPSLP Premier Add On.  The results interaction set of features provides a variety of visual cues on the location map to indicate the location a user has clicked  when viewing a list of locations., providing a variety of additional options beyond the standard Info Bubble that Store Locator Plus displays when a location is clicked.

Use the Experience add-on to completely disable the Info Bubble under the map and only use these interactive result indicators. When a visitor to your site clicks on the results marker they will see additional information such as description you have entered for that location, in addition to the fields that are populated for the location.

Info bubble turned off, marker clicked shows the additional info for that location

Q. What is the purpose of ranking under category manager?

Category ranking is a feature when you are using the Power Add-on  (for the self managed WPSLP plugin) or the Professional or higher level  subscription for MYSLP SaaS  with the category manager. The rank is used to sort the categories which will affect the map marker that is used when a location has been assigned more than one category. Following the page ranking paradigm set by WordPress, the rank field is a simple numeric weighting for the categories. This extended data attribute for categories makes it easy to re-arrange the “weight” of categories for map marker selection without mangling category slugs. The lower the number, the higher the precedence for the map marker.

The option to set a category rank can be found under the Store Locator Plus Categories tab.

Cluster Map Markers

Cluster Map Markers is available as part of the Premier plugin included with the Premier Subscription for Store Locator Plus or the Enterprise level of MySLP.  Cluster Markers show a single map marker graphic (circle with number inside it) when two or more (you set this number) markers are within close proximity to one another on the current map view.   As a user zooms in on the cluster, the clusters break apart to show the individual markers.  When  zoomed out the individual location markers combine into a single marker graphic with the count of locations represented by the graphic shown in the center. You determine the default radius and minimum number of locations  before cluster map marker is engaged.  Your “center map at” and default radius setting will effect where the map center is located.

Turn On Cluster Markers

Go to the Store Locator Plus : Settings / Map and look under the Appearance section for “Enable Cluster Markers”.

Read the Store Locator Plus news articles about Cluster Map Markers.